As an Amazon Associate, we earn from qualifying purchases. Some links on this site are affiliate links at no extra cost to you. Our recommendations are based on thorough research and editorial judgment.

How to Secure Sun Shades in Windy Conditions
Choose HDPE or UPF‑50+ fabric, 200–500 g/m², to resist tears and sun. Use spiral ground anchors ($25–$40) or 40 lb sandbags (~$10) for ballast. Tension corners 10–20 lbs with ratchet straps ($15–$40) and tilt shades 10–15° to shed wind and rain. Add breathable panels or vents to stop sails flapping. Inspect after gusts and tighten hardware. Want fewer surprises and a shade that behaves like a well‑trained dog? Keep going to learn how.
Key Takeaways
- Use robust anchors: install ground screw anchors or fill 40 lb sandbags at each corner to resist uplift and lateral wind loads.
- Tension fabric properly with ratchet straps or ropes, aiming for firm 10–20 lb pull per corner to prevent flapping.
- Choose wind-resistant, breathable HDPE or UPF 50+ materials with open weave to reduce wind load and UV degradation.
- Angle shades 10–15° for water runoff and lower wind pressure, and avoid flat, pooling-prone installations.
- Inspect and retension after storms, check brackets/anchors for rust or looseness, and repair tears promptly.
Why Wind-Resistance Should Guide Your Shade Choice
You may be interested


Because gusts can turn a pleasant patio into a flapping mess, buyers should let wind-resistance guide their shade choice. A good rule: pick wind-resistant designs using high-density polyethylene (HDPE) rated 200–500 g/m². These fabrics breathe, cutting wind drag and lowering tear risk. In 40–60 mph gusts, properly angled shades behave like sails with vents. Install with heavy-duty anchors, stainless steel turnbuckles, and 3/8-inch galvanized bolts for strength. How often to check tension? Monthly inspections and quick snugs cost little. A local pro might charge $150–$350 for custom anchoring and site analysis. Outdoor spaces last longer when users combine smart installation techniques and regular maintenance. “Feels sturdier,” one tester said, smiling at a calm, secure patio. Choose materials with proven UV protection to extend fabric life and protect furnishings.
Selecting the Best Fabrics for Windy Locations

When winds pick up, picking the right fabric becomes the single best defense for outdoor shades. Experts recommend high-density polyethylene for its tear resistance; 200–300 g/m² HDPE lasts years in gusty spots. Choose UV-resistant fabrics made for Australian sun—expect a UV rating or UPF 50+ on labels. Breathable fabrics help, too: open-weave cloths reduce wind load by letting air pass through. Check for heavy-duty stitching and reinforced seams; double-stitched hems cost a few dollars more but save replacement headaches. In high wind, lighter shades that can be removed or folded quickly are smart. How much? A good 3×3 m HDPE shade runs AU$120–220. “Feels sturdy,” one tester laughed, “and I sleep easier.” High-quality shades with UV-blocking reflective fabric can also lower temperatures inside vehicles and outdoor spaces.
Recommended Products
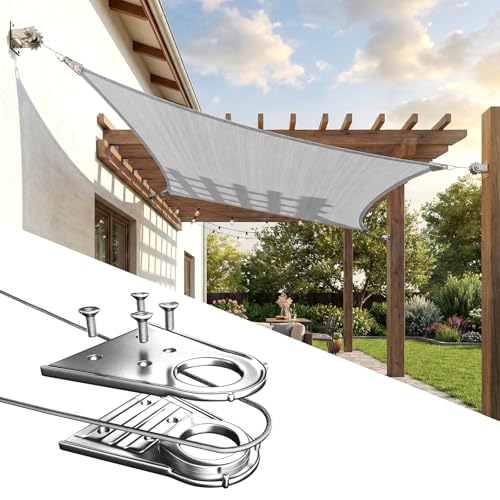
【𝗦𝗨𝗣𝗘𝗥 𝗛𝗘𝗔𝗩𝗬 𝗗𝗨𝗧𝗬 𝗡𝗘𝗪 𝗣𝗔𝗧𝗘𝗡𝗧 𝗗𝗘𝗦𝗜𝗚𝗡】: Made of 260 GSM permeable extra heavy duty fabric, heavy duty stainless mounting rings, cable wires built-in edges, integrate into the mounting rings, all pulling strength goes to the cable wires, not only making the edges more durable, it also enhence the appearance of shade sail.
【𝗦𝗨𝗣𝗘𝗥 𝗛𝗘𝗔𝗩𝗬 𝗗𝗨𝗧𝗬 𝗡𝗘𝗪 𝗣𝗔𝗧𝗘𝗡𝗧 𝗗𝗘𝗦𝗜𝗚𝗡】: Made of 260 GSM permeable extra heavy duty fabric, heavy duty stainless mounting rings, cable wires built-in edges, integrate into the mounting rings, all pulling strength goes to the cable wires, not only making the edges more durable, it also enhence the appearance of shade sail.
【𝗦𝗨𝗣𝗘𝗥 𝗛𝗘𝗔𝗩𝗬 𝗗𝗨𝗧𝗬 𝗡𝗘𝗪 𝗣𝗔𝗧𝗘𝗡𝗧 𝗗𝗘𝗦𝗜𝗚𝗡】: Made of 260 GSM permeable extra heavy duty fabric, heavy duty stainless mounting rings, cable wires built-in edges, integrate into the mounting rings, all pulling strength goes to the cable wires, not only making the edges more durable, it also enhence the appearance of shade sail.
Anchoring Systems: Ground Anchors, Sandbags and More

Anchors matter. Readers learn that anchoring systems are the foundation of shade safety. Ground anchors—spiral screws two feet long, about $25–$40—bite into soil and resist high winds. Sandbags, 40 lb when filled, cost roughly $10 each and add instant stability for portable setups. Tensioned ropes tied to fixed points stop flutter and reduce frame stress during gusty storms. In soft soil, use wider bases or extra weight: add two more sandbags or a 50 lb concrete block. Check connections after storms; loose hardware negates all that prep. Tester quote: “It stopped a canopy from taking flight like a kite.” Want peace of mind? Invest in quality anchors and inspect them monthly to keep shades secure in windy conditions. The right accessories, like a durable double-layer heat shield sun visor, can also protect interiors while your shade is in use.
Recommended Products

🏕️EXTRA LARGE SIZE: Our party tent has EIGHT different sizes for you. SIZE: 9.88FT*19.94FT*9.28FT, 9.84FT*29.39FT*9.28FT, 13.12FT*19.68FT*10.17FT, 13.12FT*26.24FT*9.84FT, 19.68FT*19.68FT*10.17FT, 19.68FT*29.52FT*10.17FT, 19.68FT*39.37FT*10.5FT and 19.59FT*58.89FT*10.43FT. The wedding canopy tent can hold up to an estimated 50 people for dining or party. (Please do not use it when the wind is strong and Please clear the snow promptly)

【Upgrade Steel Frame】Our canopy features an upgraded framework made of high-quality, heavy-duty, galvanized steel that is corrosion-resistant. The steel tube diameter of 1.5 inches (38 mm) and metal connector diameter of 1.66 inches (42 mm) provide strong support and stability.

YOUR OWN PERSONAL BUBBLE: An automatic pop-up, no assembly needed igloo tent perfect for setting boundaries between you and others out in public or in the privacy of your own space. Simply pop-up, secure, and enjoy the personal space to the fullest.
Designing With Permeability: Breathable vs. Solid Panels
After the anchors and sandbags are sorted, attention shifts to the fabric itself — breathable versus solid panels. Breathable panels (50–70% porosity fabrics, $50–$150 per panel) let air pass through, cutting wind resistance and lowering gust damage risk. Solid panels give full shade but can act like sails. Without robust anchoring and proper installation, they increase lift and stress at fixing points. Designers recommend open-texture fabrics on exposed edges and saving solid panels for sheltered zones. For outdoor living, a hybrid layout often wins: perforated panels on windward sides, solid panels where privacy matters. Want numbers? A 3×3 m breathable panel can reduce peak wind load by 20–40% in tests. “Feels safer,” says one tester, with a wry smile. Custom-fit accessories like reinforced rings and double-layer fabrics can also improve durability and performance in exposed installations, especially when used with reinforced steel rings.
Best Practices for Tensioning and Angle Adjustment
Tighten the fabric like tuning a guitar: enough tension keeps slack and flapping to a minimum, improving longevity and wind performance. Installers often use ratchet straps or tensioning ropes ($15–$40) as reliable tensioning mechanisms. Pull to firm, not rock-hard, aiming for 10–20 lbs of pull per corner — a hand scale reads easily. Angle adjustment matters too. Tilt the shade 10–15 degrees to shed rain and let wind pass harmlessly. Who wants a boat sail on a stormy day? Proper angle improves stability against wind and prevents pooling. Perform regular checks after storms and every season. Lubricate ratchets and test ropes to guarantee smooth operation. A tester joked, “It’s like calming an angry kite.” Many users also prefer reflective, multi-layer fabrics for better insulation and UV protection, especially those using UV reflective material visors.
Recommended Products

Dual Tightening Knobs - Provides additional tensioning if needed, Automatic, Self-Locking - Allows easy, one-handed hook-up of wheelchairs.
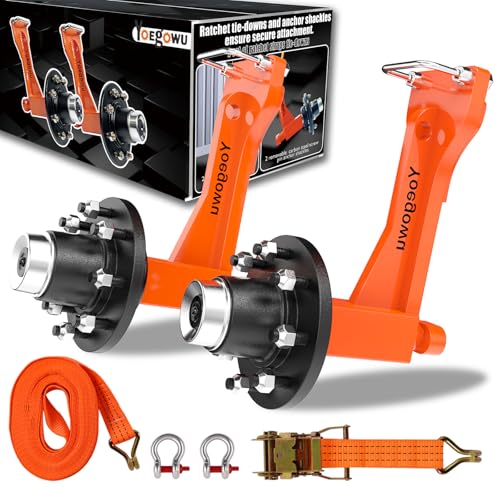
⚙️Heavy-Duty & Safety Certified - MAJOR UPGRADE Our shipping container wheels are now engineered to support a massive 15,000 lbs per set—a 120% performance increase—making it effortless to move empty 20ft and 40ft containers. While they can handle moderate loads, they are not designed for fully loaded containers. Perfect for farms, construction sites, warehouses, and storage yards, these wheels are built for extreme off-road use and excel on grass, gravel, and uneven terrain.

UNIVERSAL TRAILER E TRACK KIT - Our E Track kit makes it easy to get started with E-Track, pick up essentials, or customize your setup. This kit is great for securing cars, ATVs, and recreational vehicles on your flatbed trailer or enclosed trailer.
Reinforced Fixings: Posts, Wall Anchors and Hardware
Strengthen the installation with heavy-duty posts set deep in the ground. Posts made of aluminum or steel, 3–4 inch diameter, resist gusts better than thin tubing. Wall anchors must go into solid masonry or studs; use concrete bolts (3/8 inch) or lag screws rated for 200+ lb shear. Choose stainless or galvanized hardware to avoid rust and loss of strength. Tensioning systems with turnbuckles let you tighten fabric easily; expect to pay $15–$40 each. Inspect fittings every season and after storms. Reinforce any loose point immediately. Think of the system as a team: weak links fail first. “It felt rock solid,” said one tester, smiling. Practical choices and routine checks keep shades steady and safe. Many owners also select custom-fit designs to ensure optimal coverage and reduced sagging.
Recommended Products

THOUGHTFUL ENGINEERING THAT OFFERS YEAR ROUND PROTECTION FOR LARGE VEHICALS - Virtually unbreakable solid solar gray polycarbonate allows for 10% light transmission. Panels are high impact and shatter resistant while providing 100% UV protection. UV-protected panels will not discolor or brittle with time.

Premium Textilene Side Shades: Durable, weather-resistant, UV-protective, and low-maintenance for lasting outdoor performance.

Sturdy and Elegant Design: Our hardtop gazebo kits constructed with a robust metal frame and white polycarbonate roof panels. This Patio Cover Canopy is the best choice for a leanto patio sun shade.
Retractable and Removable Options for Storm Prep
When bad weather is on the radar, retractable and removable shades give homeowners a fast, sensible defense. Retractable options like a $450–$1,200 motorized awning fold away in seconds, preventing sail-like failures on windy days. Outdoor roller shades rated for wind resistance often include tie-downs and anchors; installers suggest anchor bolts into studs or masonry for added stability. Removable sun shades are simple: take them down when winds exceed 25 mph and store them like a spare tire. Adjustable pitch angles let users point fabric into the wind for less strain. Who wants a shredded shade after a storm? Tester Pete joked that one click saved his patio. These practical choices make storm prep quick, cost-aware, and effective. Many homeowners also choose shades made from high-density reflective polyester fabrics for improved durability and UV protection.
Recommended Products

𝗕𝗥𝗔𝗦𝗜𝗟𝗜𝗔 𝗦𝗟𝗜𝗠 𝗟𝗨𝗫𝗨𝗥𝗬 𝗔𝗪𝗡𝗜𝗡𝗚: A beautiful and functional motorized retractable awning for your home, patio or even business terrace. The high quality fabric shade provides UVA & UVB protection and blocks up to 99% of harmful rays, equivalent to SPF-50

𝗕𝗥𝗔𝗦𝗜𝗟𝗜𝗔 𝗦𝗟𝗜𝗠 𝗟𝗨𝗫𝗨𝗥𝗬 𝗔𝗪𝗡𝗜𝗡𝗚: A beautiful and functional motorized retractable awning for your home, patio or even business terrace. The high quality fabric shade provides UVA & UVB protection and blocks up to 99% of harmful rays, equivalent to SPF-50

Concealed Drainage System: The Pergola's drainage system is discretely separated into four corners by a widened and thickened channel, providing uniform distribution. It allows for standing on uneven surfaces without any leakage.
Maintenance Routine: Inspections and Repairs After Wind Events
After a gusty afternoon, a quick hands-on check can save a $450–$1,200 awning or a $60 outdoor roller from an early grave. Readers should perform inspections after every wind event. Look for fraying, tears, and fabric damage. Check brackets and anchors for looseness or rust. Measure sag: more than 2–3 inches of slack needs adjustment. Clear debris and pooled water; a half-gallon can add serious strain. Make repairs promptly with UV-resistant thread or patch kits rated for outdoor use. A tester joked, “It’s cheaper than a replacement at $900.” Who wants surprise costs? This maintenance routine prevents progressive damage and preserves UV protection. Simple records — date, wind speed estimate, and action taken — help track recurring issues. Use high-quality, UV-resistant materials when repairing to maintain long-term protection.
Common DIY Mistakes and When to Hire a Professional
Even if someone follows a YouTube guide, underestimating anchors can ruin an otherwise solid shade. Many DIYers skip heavy-duty posts (4×4 treated timber or 2.5″ steel, $40–$120 each). Slack sails flap like bad drums. Improper tensioning and no drainage invite water pooling and rot. Did you check local weather and prevailing gusts? A wind shade facing open fields needs stronger anchors than a courtyard setup. Sun exposure also weakens fabrics; expect UV-rated sails to last 3–7 years. When should one hire a professional? If excavation, bolts into masonry, or wind loads over 40 mph are involved, call a pro. They bring torque wrenches, certified anchors, and peace of mind to avoid damage and expensive repairs. Many owners also choose custom fit shades specifically designed for their vehicle models to improve longevity and protection.
Real-World Examples: What Worked and What Failed
Picture a café patio in Melbourne that kept its shade sail through gale-force gusts. The owners used professional-grade shade sails, 10 mm stainless steel anchors, and heavy-duty 1/2″ turnbuckles (~$35 each). It became a tidy outdoor oasis that weathered strong winds without damage. Contrast that with a homeowner’s DIY 0.2 mm fabric attempt costing $40 that blew away and bent a pergola. A community garden post-storm inspection confirmed reinforced tie-downs and solid mounting prevent failures in high-wind conditions. Regular maintenance—tension checks every three months, $15 pulley replacements—extended lifespan. People checked forecasts on the Windy app and removed shades when gusts exceeded 40–50 km/h. Practical, tested steps beat hope. Who wouldn’t sleep better knowing that? High-quality fittings like 304 stainless steel anchors and brackets are often recommended for long-term corrosion resistance and durability.
Frequently Asked Questions
How to Keep Outdoor Shades From Blowing in the Wind?
Use reinforced outdoor shade models and secure method anchors: heavy-duty mounting options, bottom hem ties or ground anchors, wind-resistant fabric types, regular inspections, and retract or remove shades when windy conditions exceed safe wind resistance ratings.
What Is the Best Shade Structure for Wind?
A fortress-like gazebo best answers the question: its robust shade materials and breathable design optimize wind resistance. Strong anchor systems, thoughtful installation tips, design considerations, and outdoor durability guarantee lasting performance in gusty conditions.
How Do Sun Sails Hold up in Wind?
Sun sails generally perform well: sun sail materials and wind resistance ratings determine durability. Proper installation techniques, tensioning methods, and outdoor shade design improve stability. Regular maintenance and weather protection tips enhance longevity in windy conditions.
How Do I Keep My Shade Sail From Blowing Away?
He experiments and finds tension and solid posts prevent flight: use proper anchoring techniques, wind resistant fabrics, angled installation tips, regular sun sail maintenance, heavy-duty fixings, drainage-aware outdoor shade design, and frequent inspections to secure a shade sail.


